Quantcast
Channel: Tips & Tricks – Xperia Blog
Viewing all 191 articles
Browse latest View live

Sony explains how to access UART ports for a range of Xperia devices [Developers only]

$
0
0

Sony Xperia UART PortSony Mobile is continuing its strong developer focus by releasing detailed information on how one can access the UART (Universal Asynchronous Receiver Transmitters) ports on several Sony Xperia devices. The UART port is built into the motherboard of your smartphone and makes Linux kernel development and debugging easier.

Be warned though, this is strictly for developers only who are aware of the benefits of accessing the phone through an UART port. You could end up damaging your motherboard if you’re not careful, as you will need to solder on the motherboard of your Xperia to access the port. So, decent soldering skills are a must. To identify and connect the right pins for your Sony Xperia device, click on the full instructions here, which also includes pictures of exactly where the ports are. Detailed information is provided for all Xperia phones currently in the Open Device program.

Xperia UART Port

Via Sony Developer World.


Mozilla to cease the development and sale of Firefox OS smartphones [Update]

$
0
0

Firefox OS XperiaThere was a time, albeit a couple of years back now, that Sony Mobile was rumoured to be working on new Xperia smartphones based on Firefox OS. Sony developers were certainly intrigued with the lightweight OS and even released official Firefox OS ROMs for some devices such as the Xperia E. Well it looks like Mozilla’s foray into Firefox OS smartphones has come to an end.

The company confirmed that it will end the development and sale of Firefox OS phones as it wasn’t “able to offer the best user experience possible”. Mozilla tried to crack the budget end of the smartphone market within developing regions, but struggled to compete against Android with its wide eco-system of apps. Firefox OS will continue to live on through other channels, notably within an IoT (Internet of Things) platform.

We imagine that this ceases the FreeXperia (FXP) team’s development of Firefox OS too for Xperia smartphones, but we’ve reached out for a comment. The FXP team were working in collaboration with Mozilla to support a number of Sony Xperia devices in Mozilla’s repos. Firefox OS support was included for the Xperia Z3, Z3 Compact, Z2, Z1, Z1 Compact, T2 Ultra and E3.

Mozilla statement from Ari Jaaksi, Mozilla’s SVP of Connected Devices

“We are proud of the benefits Firefox OS added to the Web platform and will continue to experiment with the user experience across connected devices. We will build everything we do as a genuine open source project, focused on user experience first and build tools to enable the ecosystem to grow.

Firefox OS proved the flexibility of the Web, scaling from low-end smartphones all the way up to HD TVs. However, we weren’t able to offer the best user experience possible and so we will stop offering Firefox OS smartphones through carrier channels. We’ll share more on our work and new experiments across connected devices soon.”


Update: FXP says that Firefox OS development will continue on Sony Xperia devices “for a long time“.


Xperia X wallpapers available to download

Install Xperia Marshmallow using Flashtool and XperiFirm [Guide]

$
0
0

MM Xperia Guide_12It is that time of the year again, where we have a major Android release and people want to update as soon as possible. We have received numerous requests from Xperia Z3+ and Z5 owners asking how they can manually update to Android 6.0 Marshmallow, using third-party utilities Flashtool and XperiFirm.

We’ve covered the process many times before, the last time being a year ago when Android 5.0 Lollipop made an appearance. Therefore, it seems like a natural time to revisit the guide. It is worth noting that whilst the tutorial below shows how to install Android 6.0 Marshmallow, the procedure can be used to flash ANY firmware build for ANY Sony Xperia device. The steps are also the same to debrand any Sony Xperia device that is currently on carrier-specific software.

Installing Xperia Marshmallow using Flashtool and XperiFirm [TUTORIAL]

Disclaimer: Please read the following instructions thoroughly before attempting to flash your phone. Xperia Blog absolves itself from any responsibility should something go wrong. Please proceed with caution and at your own risk.

Note: You will not void the warranty of your Sony Xperia device by flashing new firmware using this guide. In addition, you do NOT need to unlock your bootloader nor do you need root to flash your handset.

It is recommended that you create a backup of your existing regional/carrier firmware just in case you need to send your device back for repair. The instructions below can be used to create any firmware file, so use these to create a backup with the relevant firmware build.

Part 1: Preparation

One of the primary reasons people encounter problems in flashing their device is due to not installing the correct drivers on their computer. Please ensure that drivers for your Sony Xperia device and Flashtool software are correctly installed on your PC before attempting to install new software.

Note: This guide is written for Windows users in mind only.

1) Install drivers for your Sony Xperia

You need to ensure that your PC has all of the necessary drivers installed for your Sony Xperia device. The best way to do this is to install Sony PC Companion.

Make sure you connect your Xperia to the PC before starting the process to download the necessary USB and ADB drivers. The best way to do this is to power off your Sony Xperia and then connect to your PC whilst holding the volume down button.

2) Install Flashtool

Download and install Flashtool from the official website here. This guide is based on using Flashtool version 0.9.19.10.

Install Flashtool drivers from the following location: ‘C:\Flashtool\drivers’. Tick the “Flashmode Drivers” and “Fastboot Drivers” to install.

MM Xperia Guide_Flashtool Drivers

Note: To install the Flashtool drivers for Windows 8/8.1/10, please follow the steps below.

A) Press the Windows key + R together and in the ‘Run’ box type: shutdown.exe /r /o /f /t 00
– Now make the following selections to boot into the Start Up Setting Screen: Troubleshoot > Advanced options > Start Up Settings > Restart
– Then, when the machine restarts, select number 7 i.e. “Disable driver signature enforcement”. Your machine will start with Driver signing enforcement disabled until the next reboot.

B) Now you can install the Flashtool drivers.
– Windows will warn that the driver is not signed and will require you to confirm the installation.
– Once the installation is complete, reboot the machine

3) Enable “USB debugging” and “Unknown sources” on your Sony Xperia device

‘USB debugging’: Settings > Developer options

‘Unknown sources’: Settings > Security

Part 2: Create your FTF firmware file

You will need a FTF firmware file to install new software onto your device. The following section explains how to create your own FTF firmware file, however if you have downloaded a FTF file from the Firmware Resource section of our website or elsewhere, you can skip this step and proceed to part 3.

To create your FTF firmware file, you will first need to launch Flashtool and then click on the XperiFirm icon as highlighted below.

MM Xperia Guide_1_Red

You should now see the XperiFirm software launch into a new window. Navigate to your handset on the left pane. You can then choose the firmware for your region/carrier in the middle pane. The pane on the right side will show you which firmware is available for that region. Click on it to download the file.

Important: Only download firmware for your model and variant number. For example, if you own an Xperia Z5 (E6653), only browse and download the firmware builds listed under E6653.

MM Xperia Guide_2

Once clicked, you are asked to confirm whether you want to download the firmware. Ensure that “Unpack automatically” is ticked and then click “Download” to proceed.

MM Xperia Guide_3

Once complete, you will see the following pop message “Unpacked Successfully!” Click OK.

XperiFirm_5

The same “Unpacked successfully!” message will appear on the download dialog. Click “Close” to proceed to the next step.

MM Xperia Guide_4

You will now revert back to Flashtool, which will start creating your FTF firmware file.

MM Xperia Guide_5

Once you see “Torrent file creation finished” then your FTF firmware file has been successfully created.

MM Xperia Guide_6_red

To ensure the FTF firmware file has been created, navigate to the following location on your PC: “C:\Users\[Your PC Name]\.flashTool\firmwares”

MM Xperia Guide_7

Part 3: Flash your FTF firmware file

This section details the steps needed in order to flash new firmware onto your Sony Xperia device.

First of all, open Flashtool and then click on the lightning bolt in the top left of Flashtool as highlighted below.

MM Xperia Guide_8_Red

Select “Flashmode” and click “OK”.

MM Xperia Guide_9

You should already be in the source folder where the FTF firmware files are located. If not, navigate to: “C:\Users\[Your PC Name]\.flashTool\firmwares”

Select the firmware build version that you want to flash from the “Firmware” pane. Ensure the device variant is the same as the model number of your Sony Xperia device.

If you want to retain your apps, data and media (photos, videos, music), then ensure that the “USERDATA” option within the “Wipe” pane is unticked. However, we recommend that when upgrading a major new Android version, a clean install is the way to go. In this case, tick all options under the “Wipe” pane. This will wipe all of your data though including your photos and videos, so please ensure you have these backed up elsewhere.

MM Xperia Guide_10_b

Important: If you skipped Part 2 of the guide as you already had your own FTF firmware file, then you may see the following ‘SIMLOCK’ option ticked under the “MiscTA Exclude” pane. DO NOT untick SIMLOCK as it could lead to problems with the network lock on your device.

MM Xperia Guide_Simlock_2

Click “Flash”. Flashtool will then indicate that it is “preparing files for flashing”.

MM Xperia Guide_11_red

You may have to wait around 60 seconds for the pop-up below to appear. Once it does, you should now connect your Sony Xperia device. Make sure the device is powered off and then hold the ‘volume down’ button whilst connecting the USB cable. Once the pop-up disappears and flashing has started, you can let go of the ‘volume down’ button.

MM Xperia Guide_12

Flashtool will then start flashing your Xperia device.

MM Xperia Guide_13

Once you see “Flashing finished” as indicated below, your Sony Xperia has been successfully flashed.

MM Xperia Guide_14_red

Congratulations you have just installed Android Marshmallow! Now disconnect your Xperia device and power on the handset. Don’t worry if it takes a while for the handset to boot, this is to be expected.

To confirm that you have upgraded the phone software, click on ‘Settings > About phone’, which will reveal your new Android version and firmware build number.

Xperia Marshmallow Guide_1

If you would also like to confirm the region firmware that you have downloaded, you will need to access the service menu option. To do this, open the dialler and enter the following: *#*#7378423#*#*

Then click ‘Service info > Software info’. The CDF is an eight digit number under the “Customization Version” that should tie in with the firmware you downloaded from XperiFirm. For example, you will notice below that the CDF (software customisation version) of 1298-7362 matches the same firmware that we downloaded in the XperiFirm screenshots above.

Xperia Marshmallow Guide_2_red

Xperia X System Dump now available – what ports are you looking forward to?

$
0
0

Sony Xperia XNow that we’re under a month before the release of the Sony Xperia X, it was a matter of time before the system dump was leaked and that time has come. The full Xperia X system dump is available to download from the single SIM model (F5121) with firmware build number 34.0.A.1.264. It shouldn’t be too long before we see ports of that snazzy new lock screen and other bits and pieces. What are you personally looking forward to being ported?

DOWNLOAD: Xperia X System Dump

Xperia X System Dump

Via XDA.

Thanks Ben and Jozef!

How to boot your Sony Xperia into Safe Mode

$
0
0

sony-xperia-safe-mode-boot_2If you find that your Sony Xperia device is playing up a bit, then one way to help diagnose what might be wrong is to boot your phone into a ‘safe mode’. Booting into safe mode disables third-party apps, which means that if you are suffering from excessive battery drain or performance issues then you can use this mode to help determine whether it is one of your installed apps that is the problem.

Safe mode won’t isolate the problem to a specific app, but if you don’t experience any issues in safe mode then there is a strong likelihood that one of your apps is the culprit. This function has existed for years, but many people are not aware of its existence in Android. We often receive emails asking for support with Xperia devices and this is one of the methods that we refer people to. Please see the below instructions on how to boot into safe mode.

How to boot your Sony Xperia into Safe Mode

1. Hold down your power button to bring up the power menu. Then, long press the “Power off” option.

sony-xperia-safe-mode-boot_1

2. This will bring up a prompt called “Reboot to safe mode”. Click OK to proceed.

sony-xperia-safe-mode-boot_2

3. Once the phone has restarted, you should notice the words “Safe Mode” on the bottom left of your display. You may need to run your device in this mode for a day or so to really determine if your problems are caused by a third-party app or not.

sony-xperia-safe-mode-boot_3

4. To return to normal, simply power off your device and restart.

NOTE: Please be aware that booting into safe mode may mean that you lose some customisation on widgets or folders. When we have used the option in the past, we have found all widgets removed on occasion, which can be a pain having to reinstall them just as you like them. Another possible annoyance is that some third-party apps may require you to re-sign into them.

Three new “Xperia Tips” ideas coming soon; chosen by community

$
0
0

xperia-tips_thumbSony Mobile launched a new app earlier in the year called “Xperia Tips”. The app was designed to get the most out of your phone, based on your usage patterns. The app first featured in Sony’s Concept firmware releases and is also included in all 2016 Sony Xperia devices. These tips may seem quite basic to some of our readership, but we’re sure they serve a purpose for those that aren’t tech-minded.

Below you will find three new tips that will hit the “Xperia Tips” app later in the year. The great thing about these ideas is that they were all chosen by the Xperia Concept community, through a competition that took place earlier in the year. The designs/text below are still work-in-progress, but give an idea of what to expect when they hit your device.

New Xperia Tips cards

xperia-tips_3 xperia-tips_2

xperia-tips_1

Xperia XZ disassembly guide

$
0
0

sony-xperia-xz-teardown-23If you want to get a peek inside the Sony Xperia XZ, then you should check out the teardown pictures below. It shows Sony’s latest greatest picked apart piece-by-piece and makes you appreciate the efforts of the company’s engineers. It’s interesting to note that we couldn’t see any sign of dual heat pipes, which Sony has used on the Xperia Z5 and X series to control thermal performance. Maybe, we missed something, or Sony could be using a new way to dissipate heat in the Xperia XZ. You can check out the full disassembly guide below.

Sony Xperia XZ teardown pics

sony-xperia-xz-teardown-1

First of all you will need to remove the SIM card slot. Then, use a hair dryer or something equivalent along the edges of the display and use a guitar pick to carefully pry the display away from the chassis.

sony-xperia-xz-teardown-2

The Xperia XZ uses a Synaptics S3330 touch controller.

sony-xperia-xz-teardown-3

You will find black waterproof sealing foam around the edges of the display.

sony-xperia-xz-teardown-4

The SIM card slot also includes a rubber seal, as seen in previous water resistant Xperia models.

sony-xperia-xz-teardown-5

You will now need to remove the SIM card information sticker as well as the stainless steel plate which houses the battery.

sony-xperia-xz-teardown-6

The battery is confirmed to have a 2900mAh capacity and has part number LIS1632ERPC. The battery is fixed in place using glue, which shouldn’t be too difficult to remove, if you need to replace the battery.

sony-xperia-xz-teardown-7

Here you can see the NFC coil found on the metal plate.

sony-xperia-xz-teardown-8

The sub-board for the USB Type-C and microphone then needs to be removed, along with the vibration motor flex board.

sony-xperia-xz-teardown-9

Here you can see the USB Type-C soft board and Microphone board.

sony-xperia-xz-teardown-10

The USB Type-C port has a red rubber seal to keep the internals water resistant.

sony-xperia-xz-teardown-11

The side key board includes the fingerprint power button sensor.

sony-xperia-xz-teardown-12

At the bottom, you will find the main antenna and coaxial cable module.

sony-xperia-xz-teardown-13

The speaker module can be found on the back of the main antenna frame.

sony-xperia-xz-teardown-14

Below you can see the front and rear camera modules removed, along with the motherboard.

sony-xperia-xz-teardown-15

A close up of the 23MP rear camera lens and 13MP front camera.

sony-xperia-xz-teardown-16

Here you can find some the triple image sensors including on-board laser focus, RGBC-IR and flash.

sony-xperia-xz-teardown-17

This is how the sensors line up on the rear.

sony-xperia-xz-teardown-18

A big departure from previous models is that the rear part of the chassis does not include any kind of heat pipe. The picture below shows the headphone module removed, along with the volume and camera buttons.

sony-xperia-xz-teardown-19

ALPS supplies the headphone module and is sealed to the phone frame using foam.

sony-xperia-xz-teardown-20

Here you can see the front of the motherboard, which includes the following chips:
– Qorba QM78064 High Frequency RF Fusion Module
– Skyworks Sky77660-11 power amplifier
– Qualcomm WTR3925 RF Transceiver
– Qualcomm WTR4905 RF Transceiver
– Bosch BMI160 gyroscope
– Qualcomm WCD9335 audio decoder chip
– SK hynix H26M78208CMR 32GB ROM
– Qualcomm WSA8810 loudspeaker amplifier
– Qualcomm PMI8996 power management chip

sony-xperia-xz-teardown-21

The back of the motherboard shows the following chips:
– Murata (package) Wi-Fi/BT/FM/GPS
– NXP PN547 NFC control chip
– Qualcomm PM8996 power management chip
– SK Hynix 3GB RAM + Qualcomm Snapdragon 820 chipset

sony-xperia-xz-teardown-22

All parts of the Xperia XZ laid out in one picture.

sony-xperia-xz-teardown-23

Via eWiseTech [via LaptopMain].

Thanks Michael!


Flashtool update (0.9.23.0) brings Android Nougat support

$
0
0

sony-android-nougatFlashtool developer Androxyde has added Android 7.0 Nougat support to the popular Xperia flashing utility. Flashtool build number 0.9.23.0 now allows the ability to flash Nougat FTF firmware files to Xperia devices.

Other changes include TA raw backup for all devices that can be exploited by the dirtycow vulnerability. There is also a new property that will tell you if you need to use a FSC (Flashtool Script) to flash your device or not. The latest build of Flashtool can be downloaded here.

flashtool-0-9-23-0-nougat-support

Thanks Jenge!

Five Sony Xperia devices receive official ‘LineageOS’ software

$
0
0

Lineage OS emerged from the demise of CyanogenMod at the turn of the year. It was therefore only going to be a matter of time, before we saw LineageOS software builds arriving for Sony Xperia devices. This has now happened with five Xperia devices from 2012 and 2013 receiving LineageOS experimental and nightly builds – this includes Xperia M, Xperia SP, Xperia T, Xperia TX and Xperia V. If you are using one of these handsets then you can download LineageOS here.

Thanks Vishnu!

Jolla’s Sailfish OS is officially heading to Sony Xperia devices

$
0
0

Jolla announced earlier today that its open operating system, Sailfish OS, will soon be officially heading to Sony Xperia devices. Jolla and Sony Mobile are working together to support Sony’s Open Devices Program. The first port is a Sailfish OS powered Xperia X, which is currently on display at the MWC tradeshow in Barcelona.

Jolla aims for a community release on Xperia devices by the end of the June 2017. Sony Mobile has always had a commendable open device policy, and this latest collaboration with Jolla is further evidence of this.

Thanks J, Sebastian and Rohit!

Xperia Loops live wallpaper now available to download

$
0
0

Sony Xperia has a new live loop wallpaper for the 2017 Xperia range, including the flagship Xperia XZ Premium. If you’ve been eager to test the wallpaper on your own Xperia device, then you’re in luck, as the Xperia Loops live wallpaper can be found below.

The apk file will only install on stock Xperia Android Nougat firmware, so don’t go trying it if you’re still on Marshmallow. Make sure you have “Unknown sources” enabled under Settings > Security. Let us know how you get on in the comments below.

Update: Please check out the warning from Artem Russakovskii of Android Police fame below, regarding the signature of the apk below. Download at your own risk.

DOWNLOAD APK: Xperia Loops

Via XDA.

Xperia XZs and XA1 system dump now available

$
0
0

Sony Mobile’s firmware for the upcoming Xperia XZs and Xperia XA1 is now live on Sony’s servers, which has meant that developers have been able to extract the official system dumps for each handset. This means that the official wallpaper, widgets and more can be ported to other Xperia handsets. You can find download links below.

DOWNLOAD: Xperia XZs system dump (Based on firmware build 41.2.A.0.191)
DOWNLOAD: Xperia XA1 system dump (Based on firmware build 40.0.A.1.55)

Thanks Ben, Diogo and Jozef!

Xperia XZs: Download the Clock Widget, Xperia Loops Theme, Live Wallpaper and more

$
0
0

We earlier reported that the system dump for the upcoming Xperia XZs and Xperia XA1 is now available. So it’s of no surprise that a number of goodies have been extracted and is available to download below, courtesy of PhonerX from XDA. All of the below, work on stock Xperia Nougat software without the need for root. You will find the latest Xperia XZs Loops Theme, Live Wallpaper, Clock Widget and wallpapers. Enjoy!


Download Xperia XZs widgets, themes and wallpaper

Xperia XZs Clock Widget

Xperia Loops Theme 1.0.A.0.12

Xperia Loops Live Wallpaper 1.0.A.0.28

Xperia XZs Wallpapers

Via XDA.

Thanks Furkan!

Jolla’s Sailfish OS to begin testing on Xperia X in a few weeks

$
0
0

Jolla announced earlier in the year that its open operating system, Sailfish OS, would be heading to Sony Xperia devices. A port of Sailfish OS on the Xperia X was shown off at MWC in Barcelona. Jolla has given an update on the progress it is making, and confirmed that community release for the Xperia X will arrive before the end of July.

Jolla confirmed that one of biggest development challenges it has faced is the support for Android apps. Another challenge facing the team is making the installation easy enough for normal users to complete. Part of the difficulty is the fact that the Xperia X is the first 64-bit ARM device that they have run Sailfish OS on.

Jolla’s closest community development group, the Cbeta testing group, will get to test Sailfish OS 2.1.2 release for the Xperia X before the end of the month. There will then be a wider delivery to the community at some point later.

In terms of supported devices, Jolla also confirmed that right now the focus remains on the single SIM version of the Xperia X, and will look consider development of other devices later. For more details hit the source link below.

Via Jolla Blog.


Jolla Sailfish X for Xperia X to launch on 27 September

$
0
0

The team at Jolla has announced that Sailfish OS, or as it’s now known, Sailfish X, will be launching on the Xperia X on 27 September 2017. The Jolla devs say that the software is “great, and it works very well”, including Android app support, mobile data and cameras. You can check out a video below of the progress that has been made.

However, the Jolla devs reiterated that this is a long-term project and there are a number of features that will not be supported in the first release. This includes Bluetooth, new sensors (e.g. barometer, step counter), fingerprint, and FM-radio. The Sailfish X ROM will be available to download in the EU, Norway and Switzerland on 27 September, and will cost €49.90.

To download Sailfish X you will need the single SIM version of the Xperia X. It’s great to see Jolla giving Xperia X owners a chance to try something fresh on their device – are there any owners looking to give Sailfish X a try? Let us know your thoughts below.

Via Jolla Blog.

Thanks Diogo, Hardiksinh, mrninko, Rohit, Subham and Walaspancha!

Jolla’s Sailfish X now on sale for Xperia X

$
0
0

Jolla first announced that it was looking to bring the Sailfish OS to an Xperia device earlier in the year. Fast forward to today, and Jolla has announced that Sailfish X for the Xperia X is now available for purchase and download.

This secure operating system has Android app support and is supported on the single SIM version of the Xperia X only. Once you purchase the ROM, you will be prompted to download and install Sailfish X straight away. If you want to give the ROM a try then head over to the link here.

Via Jolla Blog.

New Xperia Loops wallpaper from Xperia XA2 available to download

$
0
0

Sony Mobile has created a new variant of its Xperia Loops wallpaper for its new 2018 handsets, including the Xperia XA2 and XA2 Ultra. If you’re looking to try this new wallpaper for yourself, then you’ll be glad to hear that the APK has been extracted and modified to work on your stock Xperia handset. There are six ‘liquid’ wallpapers to choose from (Liquid black, Liquid silver, Liquid sky blue, Liquid blue, Liquid gold, Liquid pink) and you can download the APK from the link below.

DOWNLOAD APK: Xperia Loops (2.0.A.0.8.3)

Via XDA.

Official LineageOS 14.1 build arrives on Xperia Z5 (Android 7.1.1 Nougat)

$
0
0

The official LineageOS 14.1 custom ROM is now available to download for the Sony Xperia Z5. LineageOS 14.1 is based on Android 7.1.1 Nougat and provides a close to stock experience, for those that don’t like the official Sony software. If you want to find out more information, head over to XDA. Hopefully, this is a good sign that the Xperia Z5 will receive official LineageOS 15, which is based on Android Oreo, especially as the handset won’t get any Oreo love officially from Sony.

Thanks Phil G!

Newflasher guide to install new firmware for Xperia XZ Premium, XZ1 and more

$
0
0

One of the most frequent questions we get asked from Sony Xperia owners is how to change the firmware. Whether that relates to upgrading/downgrading major Android versions, debranding the handset or simply changing the firmware region for faster updates.

Using the Flashtool application has been the main way to go about this, but when Sony released its 2017 Xperia models, it changed the flashing process which rendered Flashtool redundant. This is where Newflasher, a command line Xperia flashing tool developed by XDA member munjeni, comes in.

While Flashtool was recently updated to support some of the key 2017 Xperia models, including the Xperia XZ Premium and XZ1, we thought it would be useful to write a tutorial for Newsflasher as it provides an alternative, easy-to-use way to flash your Xperia firmware.

The instructions below can be used to flash ANY firmware build for 2017 Sony Xperia devices and beyond. It is a useful process for those wanting to debrand, or if you are a US Xperia owner wanting to change your firmware version to add back the fingerprint sensor functionality.

Install new Xperia firmware using Newflasher [Tutorial]

Disclaimer: Please read the following instructions thoroughly before attempting to flash your phone. Xperia Blog absolves itself from any responsibility should something go wrong. Please proceed with caution and at your own risk.

This guide is only intended to be used for Sony Xperia devices from 2017 and onwards. Please use Flashtool to flash firmware for older devices.

Note: You will not void the warranty of your Sony Xperia device by flashing new firmware using this guide. In addition, you do NOT need to unlock your bootloader nor do you need root to flash your handset.

By following this method to flash your phone you will end up wiping all data. Therefore, please ensure you back up your data and any photos/videos you have taken. You can find Sony’s own backup service within ‘Settings > System > Xperia Backup & Restore’.

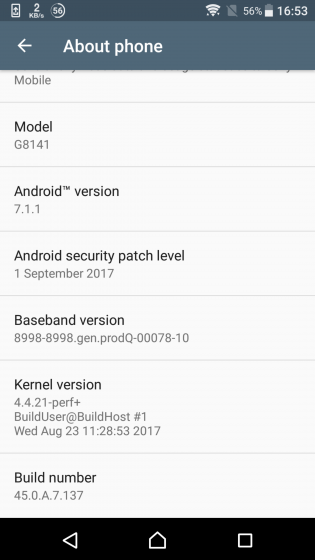
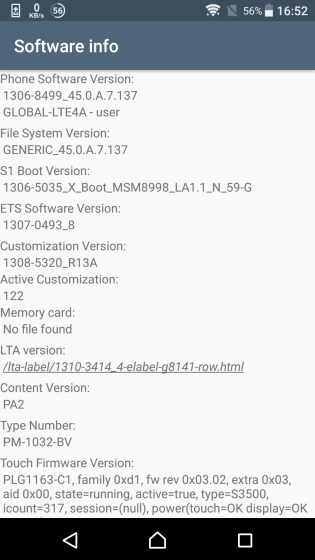
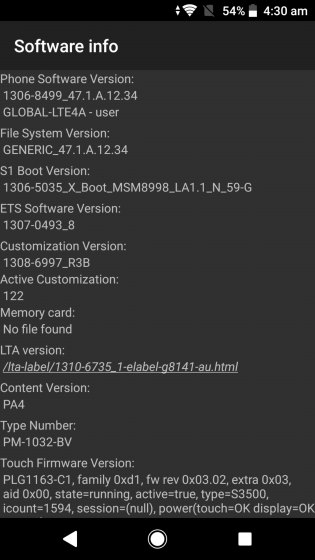
For the purpose of this guide, we will be flashing a Sony Xperia XZ Premium (G8141) from Android 7.1.1 Nougat to Android 8.0.0 Oreo. We will also be changing the handset’s region from UK (1308-5320) to Australia (1308-6997). Below are the reference screenshots prior to starting. The left screenshot shows the Android version and current firmware build number. The right screenshot shows the current region software version (see the 8-digit number under ‘Customization Version’).

Part 1: Preparation

One of the primary reasons people encounter problems in flashing their device is due to not installing the correct drivers on their computer. Please ensure that drivers for your Sony Xperia device are correctly installed on your PC before attempting to install new software.

Note: This guide is written for Windows 10 users in mind only.

1) Install drivers for your Sony Xperia

You need to ensure that your PC has all of the necessary drivers installed for your Sony Xperia device. The best way to do this is to install Sony Xperia Companion.

Make sure you connect your Xperia to the PC before starting the process to download the necessary USB and ADB drivers. The best way to do this is to power off your Sony Xperia and then connect to your PC whilst holding the volume down button.

2) Download Newflasher

Download Newflasher from XDA. We are using Newflasher v10 for the purpose of this guide. Once downloaded, extract the RAR file to an appropriate location on your computer. You can use WinRAR to extract the file.

3) Install Flashtool and XperiFirm

Download and install Flashtool from the official website here. Flashtool integrates the XperiFirm application, which you will need to download the necessary firmware files.

While we won’t be using Flashtool to flash firmware in this guide, by installing the application you can ensure that the necessary Xperia drivers will be installed on your computer. Install Flashtool drivers from the following location: ‘C:\Flashtool\drivers’. Tick the “Flashmode Drivers” and “Fastboot Drivers” to install.

4) Enable “USB debugging” and “Unknown sources” on your Sony Xperia device

‘USB debugging’: Settings > Developer options

‘Unknown sources’: Settings > Security

Part 2: Download Xperia firmware

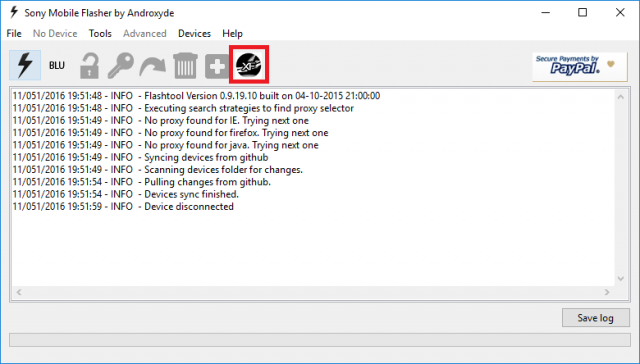
You will need to download firmware files to install new software onto your device. First, launch Flashtool and then click on the XperiFirm icon as highlighted below.

MM Xperia Guide_1_Red

You should now see the XperiFirm software launch into a new window. Navigate to your handset on the left pane. You can then choose the firmware for your region/carrier in the middle pane. The pane on the right side will show you which firmware is available for that region. Click on it to download the file.

Important: Only download firmware for your model and variant number. For example, if you own an Xperia XZ Premium (G8141), only browse and download the firmware builds listed under G8141.

Once clicked, you are asked to confirm whether you want to download the firmware. Click “Download” to proceed.

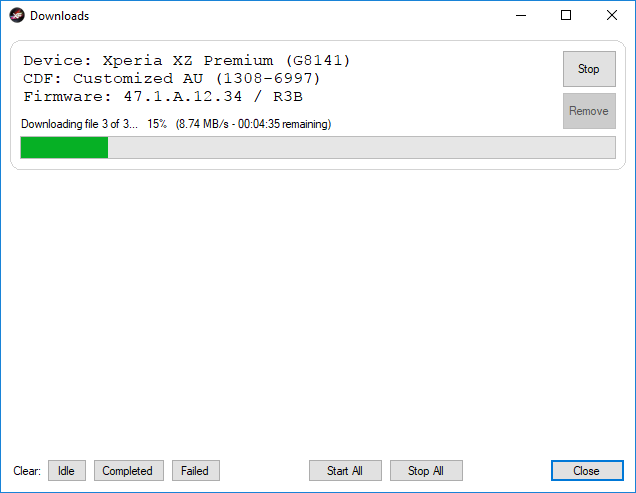
This will launch a pop-up ‘Downloads’ window, showing the progress of the download. Once it is complete, click “Close” to proceed to the next step. Make sure you note the folder where you have downloaded the firmware too.

Part 3: Prepare firmware for flashing

If you have followed the above steps correctly, you should now have two new folders on your computer. One firmware file (in this example, called “G8141_Customized AU_1308-6997_47.1.A.12.34_R3B“), and another folder called “Newflasher“.

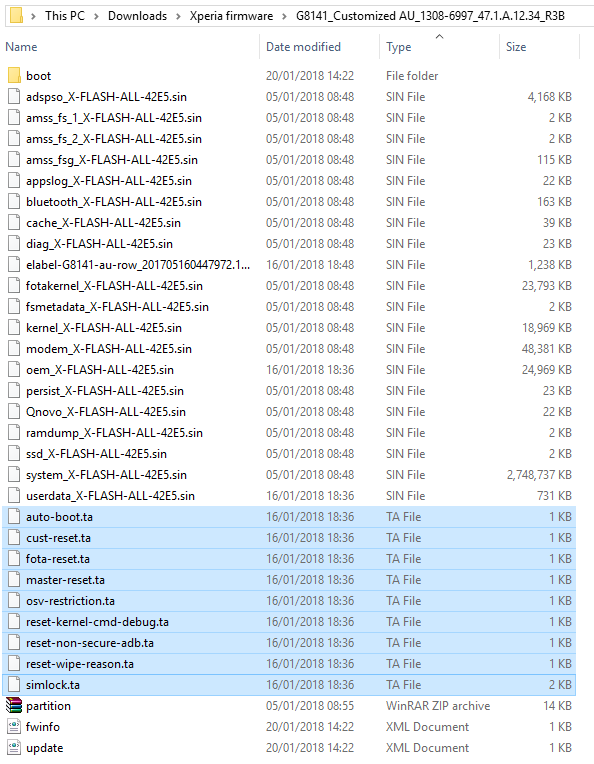
Here are the untouched contents of the Xperia firmware folder for your reference.

Here are the untouched contents of the Newflasher folder for your reference. You can see that we have used Newflasher v10 for this tutorial.

Now open the firmware folder. Select and delete all of the .ta files in the main folder.

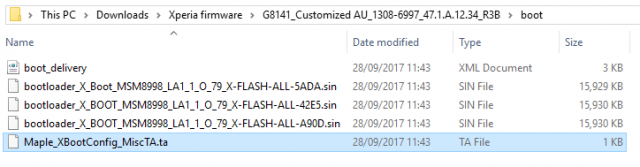
Now open the ‘boot’ folder within the main firmware folder. There is one .ta file in here called ‘Maple_XBootConfig_MiscTA‘ that you also need to delete.

Create a new folder called ‘partition’ in the main firmware folder. Now extract partition.zip which is found in the main firmware folder into this new ‘partition’ folder. The files extracted will look something like the picture below.

Once you have completed all of the above, your firmware folder should look something like the below. All of the .ta files are deleted and the partition.zip file has been extracted into a new ‘partition’ folder.

Now the final step in preparing your firmware, is to copy the entire contents of the firmware folder to the Newflasher folder. Once complete, your Newflasher folder should look like something below. The highlighted files are those copied across from your firmware folder.

Part 4: Flash Xperia firmware

If you’ve reached this stage, then that’s the hardest part done. This next section involves the process of actually flashing your Sony Xperia device.

Connect your Sony Xperia device. Make sure the device is powered off and then hold the ‘volume down’ button whilst connecting the USB cable. Double click the ‘newflasher’ application as highlighted below.

A Windows command prompt will now open. Type ‘n’ and press Enter.

You will once again need to type ‘n’ and press Enter.

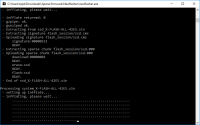
Your Sony Xperia device will now begin to flash new firmware.

Once complete, you will receive a message that “You can disconnect your device when you close newflasher.exe“. Congratulations, your Sony Xperia device has now been successfully flashed to new firmware.

Disconnect your Xperia device and power on the handset. Don’t worry if it takes a while for the handset to boot, this is to be expected. To confirm that you have upgraded the phone software, click on ‘Settings > About phone’, which will reveal your new Android version and firmware build number.

If you would also like to confirm the region firmware that you have downloaded, you will need to access the service menu option (open the dialler and enter *#*#7378423#*#*). Click ‘Service info > Software info’. Search for the 8-digit number under “Customization Version”. For example, you will notice below that the software customisation version of 1308-6997 matches the Australia firmware that we downloaded in the XperiFirm screenshots above.

Viewing all 191 articles
Browse latest View live